

In the previous post, it was described how to return Windows Mail to its working state after updating Win10 to version 1709, in which Microsoft removed it from the system. But this state was not completely working, since the MAPI (Messaging Application Programming Interface) functionality for WinMail has not been restored. Being brief and shallow, one can define MAPI as the interface which allows you to manage the mail client from the external environment. The most common function of MAPI is to attach files or folders via the context menu Send to - Mail recipient of the File Manager, as well as from external programs - for example, MS Office utilities.
As I hoped, the collective intelligence overcame this problem. Geeks found missing keys in the registry, and MAPI returned to work. As a result, you are now reading the second series of the saga.
- In this article, the archives for downloading will be posted again. I want to focus your attention: new archives are CUMULATIVE, they include the whole contents of archives from the first series with additions important for MAPI.
- The sequence of actions in the first three steps will be identical for both 32-bit and 64-bit Windows.
- Steps 1 and 2 completely replicate those of the first series, so if you previously copied the contents of the Windows Mail and system32 folders, you can skip them now.
Read entire article... 32 comments

In the most recent cumulative update of Windows 10 at the time of writing - "Fall Creators Update", version 1709 - Microsoft has finally done what the fans of good old Outlook Express and its subsequent reincarnation Windows Mail were so afraid of: they uprooted it from the file system and Windows registry. Up to version 1703 inclusive, the method described here worked well, but now it is impossible to enable the inactive mail client this way - because of its absence in the OS. But another Microsoft's attempt to prove more stubborn than geeks ended up just like the previous ones: a way to implement the mailer back into the system was found.
Enthusiasts returned the program almost full functionality in version 1709. Almost - since it is not yet possible to restore MAPI clients in working order. But, hopefully, this problem will be solved soon.
I tested the results of research and, it seems to me, found the necessary minimum of changes to the files and the registry, which is sufficient to restore all the functions of WinMail (excluding MAPI). Let me share the final result.
So, Windows 10 successfully replaced the poor 8 and 8.1 versions. Accordingly, there will no longer be articles about these OSes, but Windows 10 will be considered. And for a start - the same thing that was already mentioned in case of Windows 7: reinstalling on top, that is also called repair installation.
For Win7, the method has been described in full detail. For Win10 - all the same. Minor differences are mainly in direction of simplifying the process itself. So I strongly recommend that you first carefully study the article Reinstall Windows 7 without losing programs and files from its beginning to the "Installation process" section. Description of the method, requirements and recommendations where to get the distributive (including multiple editions) are entirely relevant to Windows 10. Here I will go directly to the illustrated description of the process and will focus on the differences from the same for Windows 7.
Installation process
- Insert DVD or connect flash drive. Run
setup.exefrom the root of distributive. Unlike 7, the dialog box with the "Install" button does not appear, the preparation for the installation is accompanied by the relevant information, and the first dialog that requires your reaction is Get important updates.
In my practice, as in case of Win Seven, updates for installation program have never had a positive effect on the future process. Moreover, if you still agreed to the updates, then the stage of checking their availability and receipt can greatly increase the installation time. Therefore, my advice would be: do not settle for updates during the reinstallation process, make them later, at a time convenient for you. Better yet - before installing, disable Windows Update using the appropriate guide. The updating service in Win Ten generally behaves very intrusively and is hardly controllable. I prefer to keep it off and update the system when the computer is not used for work.
The method of Windows repair placed in the headline of this article has already been mentioned here a year and a half ago. I did not plan a detailed description, but since then it's been discovered that many site visitors have very vague idea about it. For example, after the recommendation to make a "reinstall on top of the existing one", the discussion participant supposed that "it is something from the times of Win 98/ME". As for me, I consider this technique extremely effective and have been often using it in my practice to recover normal functionality of Windows from XP to 8.1 inclusive. So after all I decided to describe the process in full details.
The guide devoted to recovery of the Windows Mail functionality, which had been disabled by Microsoft in Windows 7, was written more than three years ago, but the problem is still actual for lots of disgruntled users who did not adjust to Windows Live Mail, proposed instead. For those who switched over to Windows 8, and then upgraded to 8.1, I've made вАЛвАЛa similar manual for these OSs not so long ago. But Win7 is still good and very popular, and interest in the revival of WinMail under this OS did not decrease lately, but even grown. In the discussion of the article commenters brought up a number of specific problems that have arisen in different editions of the system. As a result of this discussion, some corrections and additions have appeared, and I have the honor to present them to my readers.
Will focus on issues that have arisen and resolved while executing the appropriate steps of the main guide. So, let's begin.
Many users being accustomed to Windows XP, after upgrading to Windows 7 or 8 wonder: why do I need the option to run files as administrator if my account is admin as it is? The matter is that Microsoft developers have not provided a regular user accounts, even with the status of "Administrator", with full rights (as it was in XP), in order to prevent a full-fledged launch of programs, among which may be found potentially malicious ones. And the user himself, if he or she is not sufficiently advanced, can make a mess in the operating system if his/her rights to run system commands are unlimited. For advanced ones there is a special account named "Administrator", which is essentially the Super Administrator, in which all of these restrictions are removed. But, unlike WinXP, it is disabled by default. There are several ways to enable the super-admin account, and I will try to describe them here in detail and with clickable pictures.
A few notes:
- The methods which are suggested to consider, work for all OSs listed at the title of this article. The only difference is in step 1 of method 3, but there is a separate article about it, and I mention it below. Screenshots are taken in Windows 8.1.
- Methods 1 and 2 are applicable only for Windows 7 Professional, Enterprise and Ultimate, since in Starter and both Home editions the necessary Microsoft Management Console (MMC) snap-in is unavailable. For Windows 8/8.1 Pro and Enterprise, all three methods work with a bang, but in the "basic" editions the first two methods are not appropriate for the same reason as for the Windows 7. Method 3 is suitable for all versions (except, of course, Windows RT and RT 8.1).
- Also, in Win8/8.1 all actions are carried out in the PC desktop interface using good old technique - via keyboard and mouse. Modern Metro-interface is not used.
The foreword is over. Let's get ready to Rumble!
Method 1: Via the "Local Users and Groups" MMC snap-in.
- Press and hold down the Windows key, and then press R (Win+R). The Run dialog will open.
- In the Open box type the command lusrmgr.msc.
- Click the OK button or hit Enter.

Such a goal arises quite often, because some system commands are not executed without Windows Administrator rights. Why in Seven and Eight admin is not entirely the admin, and often not the admin at all, I note in the next article devoted to the issue of enabling a fully-fledged administrator account. Also there, in one of the methods, it is necessary to run the command prompt window as administrator. Since for Windows 7 and 8/8.1 this goal is achieved in different ways, I'm separately giving a sequence of actions for different versions as well as screenshots, which are as always clickable.
Windows 7.
- Click the Start button or press the Windows key.
- At the command prompt type: cmd.
- In the results list find cmd.exe and right-click on it.
- In the popped up menu select Run as administrator.

For almost three years since the writing of the guide for reanimation of the Windows Mail client under Windows 7 operating system, it was found out that the theme is still in great demand, and users still don't like Windows Live Mail. Also since then Windows 8 came out, and got even upgraded to 8.1. I have been continuing to use Seven, yet not seeing for myself any clear reasons for moving to 8. My customers to whom I had been restoring WinMail during this period, have also been using Windows 7 by the moment. However, given that OEM-computers have been already coming with the Eight aboard throughout a long time, and the system shows good results, then sooner or later the question posed in the title of this article would have to be attended. It was found in the Web a solution to the issue, which I tested, corrected, supplemented, and am now introducing to the public.
The fastest way to open the necessary window - use hot keys (accelerators).
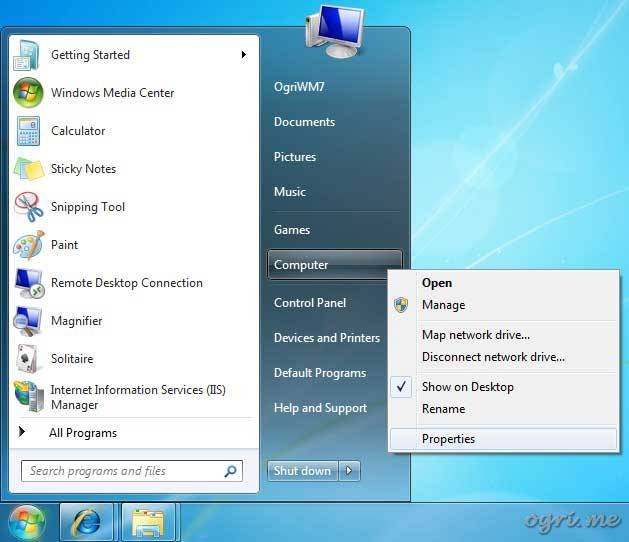
1. Press and hold the Windows key, and then press Pause/Break. The information window System will open.

Methods of dealing with failures that occur when you install updates Windows, mentioned in previous articles (here, here and there) often work; but the number of types of failures, their identifiers and descriptions of relevant errors is quite a lot, and these techniques do not treat some of them. Actually, a subclass of errors when installing updates is a small part in the total mass of Windows failures. They are not harmful to try when the time to repair is limited. If they did not help, you will need more time anyway. But it is desirable to utilize it wisely and not to perform unnecessary actions. So what, should we install the operating system from scratch having lost all settings and programs, and then restore it all over again? Waste a lot of time and efforts? There are more competent ways. They require, of course, certain skills, as well as attentiveness and having more or less time depending on the capacity of your hardware and on the OS version. They also require a pre-arranged resources.
Let's continue the subject of elimination Windows errors, which has been started here. The problems that arise when installing updates will be considered. I tried to put together some guidelines to help in resolving them.
Methods set out below are effective for all versions of the operating system since Windows 2000 SP3. If certain version or bit depth requires separate action, it will be explicitly noted.
Described fixes are also useful for the treatment of a variety of updates issues. If you have received error messages of the general type:
Some updates were not installed
A problem on your computer is preventing updates from being downloaded or installed
or the like, it is quite likely that one or more of the following methods would help solve the problem. In my practice, at least, I used them many times, and in most cases faults were eliminated.
So, to the point!
Step 1: Check Windows Installer service.
1. Click Start.
2. Type services.msc in the search box.
3. In the results list, right click on services.msc.
4. In the popped up menu, select Run as administrator.

1. Click Start.
2. At the command prompt type: cmd.
3. In the results list find cmd.exe and right click on it.
4. In the popped up menu select Run as administrator.

Windows XP is still in demand. Many people love it and do not want to change to a newer version, especially on old hardware. So some little known methods of troubleshooting in this OS remain topical to this day. Here is one of them.
A typical problem: when installing Windows XP (especially over the existing one - Repair Installation), the process hangs after "34 minutes remaining" is being shown on the screen. There is one hack that is triggered in my practice over and over and solved the problem. The following actions need to be done.
 Starting position: there is an old computer with Win2K on board. Some ancient and hard-to-get programs are installed on it. Their installation disks had been lost long ago, so they cannot be reinstalled on a new operating system, and their compatibility with even WinXP is in doubt. In addition there is the newly obtained machine with cool i7 processor and pre-installed Windows 7. Objective: to get rid of that old computer, retaining the old programs with all their settings.
Solutions:
1. Migrating Win2K as a second system to the new computer with multiboot. Create a new logical drive, clone Win2K on it, install a boot manager on Win7 (eg, free EasyBCD), solve the problem of compatibility with the SATA AHCI and other drivers. Undoubted disadvantage of this option is the need to unload each OS to run another one, and it's provided that drivers for a very old system on modern hardware are found. And also the installation of a SATA controller drivers using Intel Matrix Storage is still dancing with a tambourine, and not the fact that it will go through.
2. Porting to a virtual machine. In my opinion - the best option. But it may encounter pitfalls, and this article is devoted to the matter how to overcome all of them.
Not so long ago I bought a bluetooth stereo headset (Motorola S9-HD by the way, this one:

Cool sound, built-in microphone. I'm very happy about the device and can recommend it to anyone). Paired the headset with my laptop and have been enjoying the brilliant sound quality. Sometimes I've also been connecting my good old wired headphones, for example, when forget to charge the battery of the new ones. The process of switching playback devices is not so time-consuming: right-click on the Speaker icon in the system tray -> select Playback Devices -> in the Playback tab of the Sound dialog choose the appropriate device and then click the Set Default button. But still it's annoying to perform this sequence every time you want to pass to different device, so I was wondering if there is an easy way to automate it.
 That's such a goal arose. Trivial at first glance, impossible at the second, and at the last - pretty doable. Let me go into details.
Transferring of Microsoft email accounts from one computer to another is being a standard action for me over a long time and did not cause any difficulties so far. OE, Windows Mail in Vista, MS Outlook up to 2007 - all of them perfectly transferred information to each other. How - easily, using their staff converters, and if you know where that information is located, the data can be transferred just as files (this only applies to OE and WinMail, of course, they do not fundamentally differ from each other; MS Outlook contains everything in a single file, but import and export were always simple). And now - Outlook 2010 offers import from OE or WinMail, but it's in the PC that is running Seven, which includes neither one nor the other. The Web offered to buy an appropriate converter for $40. This is not the solution. And then I was thinking that the method of rescue WinMail from obscurity in Windows 7, as described in the previous article, can be handy for resolving this issue too. Reinstantiate WinMail, transfer the account from OE to it, and run import from WinMail in Outlook. The process is pretty long for some reason (in my case migration of nearly 1700 contacts took forty minutes at a fairly fast computer), but finally completed successfully. So thanks, everyone is happy.
 Outlook Express, to put it mildly, is not the ideal mail client, but it was (and still is - for users of XP and earlier versions of Windows) popular due to ease of its using and because it is integrated into the operating system. We know that it has been replaced with Windows Mail in Vista, but this "new" mail client is not much different from OE on the interface and functionality. The buggy Vista had not have long life and finally gave way to Windows 7. It has been decided by Microsoft to deactivate WinMail and to promote Windows Live mailer instead. I have often been configuring my customers' computers with freshly obtained Win7, designed to replace the old ones running XP and below, and been transferring an information including OE accounts, messages and addresses. Most of these customers are unadvanced users (otherwise they would manage this task themselves) and want to have mailer they were accustomed to over the years of using. Hereby a method of forcible enabling of WinMail in Win7 described in this article might come in handy.
-
Saturday, 10 February 2018 18:48
Implementation of Windows Mail into Windows 10 version 1709. MAPI restored! -
Tuesday, 02 January 2018 16:40
Implementation of Windows Mail into Windows 10 version 1709 -
Friday, 18 November 2016 19:14
Reinstall Windows 10 without losing programs and files (Repair install) -
Thursday, 16 April 2015 19:17
Reinstall Windows 7 without losing programs and files (Repair install) -
Wednesday, 07 May 2014 14:08
Enabling Windows Mail in Windows 7 - retrospective review three years later
-
Implementation of Windows Mail into Windows 10 version 1709
-
 05.04.2020 16:16
Sehr geehrte Damen und Herren, das Problem, das ich in meiner Mail vom 03.04.2020 dargestellt habe, ist ...
05.04.2020 16:16
Sehr geehrte Damen und Herren, das Problem, das ich in meiner Mail vom 03.04.2020 dargestellt habe, ist ...
-
03.04.2020 09:06
Sehr geehrte Damen und Herren, gro√Яartig, dass Sie eine L√ґsung anbieten, mit der вАЮWindows MailвАЬ ...
-
-
Implementation of Windows Mail into Windows 10 version 1709. MAPI restored!
-
 15.05.2021 16:31
schick mir ne Mail, auf wolframjahn at t- .... meine Antwort war wohl zu gro√Я, wurde immer als ...
15.05.2021 16:31
schick mir ne Mail, auf wolframjahn at t- .... meine Antwort war wohl zu gro√Я, wurde immer als ...
-
 04.02.2021 09:57
Are the zip archives no longer available? I can't download anything.
04.02.2021 09:57
Are the zip archives no longer available? I can't download anything.
-
 13.01.2021 17:32
Ok I think I fixed it I followed this, but instead of adding to WLM which i don't have i added them into ...
13.01.2021 17:32
Ok I think I fixed it I followed this, but instead of adding to WLM which i don't have i added them into ...
-
13.01.2021 17:20
This is the error It doesn't seem to be able to send or receive emails An unknown error has occurred.
-
13.01.2021 17:19
This is the error It doesn't seem to be able to send or receive emails An unknown error has occurred.
-
13.01.2021 12:22
Hi, Does this work with the latest update of windows 10 I'm having a few issues now since updating ...
-
 02.07.2020 12:35
Hi. I need assistance with step 5 "Copy all files from the SysWOW64 in the archive to the folder ...
02.07.2020 12:35
Hi. I need assistance with step 5 "Copy all files from the SysWOW64 in the archive to the folder ...
-
 01.02.2020 02:08
Thank you for restoring Winmail.
01.02.2020 02:08
Thank you for restoring Winmail.
-